Showing posts with label Quilting. Show all posts

Saturday, September 3, 2011

Little Apples-Baby Quilt

Forgive me for my quietness through August. I have been working hard on a baby quilt for my dear friends who are due with their first baby in mid-September, but my friend also happens to be a dear reader (thank you!). Therefore, secrecy was a necessity. But we gave them the quilt last night, so it's with great relief that I can finally share with you all this sweet baby quilt made with Aneela Hoey's most adorable Little Apples collection.

Little Apples-1

I was so thankful when my small group at church agreed to let me make a quilt for our friends for part of their group gift. I was dying to get my hands on Little Apples and this was the perfect opportunity. Our friends have decided to not find out the gender of their little one beforehand which I admit made things a bit more difficult, but I think this fabric collection, with its aqua, olive, gray, and red, keeps things pretty gender neutral.

Little Apples Quilt Detail

The best part about Aneela Hoey's prints are these little drawings which make fussy cutting such a pleasure. There are kids playing Ring-around-the-Rosie, cute back-to-school outfits, turtles, snails, squirrels, apple trees, and hula hoops. All the things that remind us of the fall when we buy new pencils, pull on our sweaters, and look forward to jumping in piles of raked leaves.

Little Apples


It seemed that when our friends received this quilt last night that this little white block was the most special part. Everyone from our group signed it for them. This was such a fun way to remind these new parents of our love for them and their new baby and to let them know how excited we are to help raise this newest member of our family.


About this Quilt:
Fabric: Little Apples & Medium Gray Kona Cotton
Binding: Michael Miller's Dumb Dots in red
Size: approx. 36" x 36"
Pattern: Windmills and Pastures (designed by me)
Quilting: Hand-stitched with Perle 8 in red

Little Apples Quilt Label

Now, I just can't wait to meet the little baby who will get wrapped up in this quilt! I know I'm not the only one :)

Tuesday, August 9, 2011

Cross Quilt: Ready for the Show!

As hoped, I breezed through my second Modern Cross Quilt (especially once all the cross piecing was done). On Saturday afternoon I had a borderless quilt top and by bedtime I had bordered, basted, quilted (in multi-colored thread), embroidered, and attached my binding! Yay for tiny quilts! That left just the hand-finishing of the binding to be done in bed on Sunday morning. Once again, I feel that the quilting has redeemed the quilt. Something about all the quilting lines, the colored thread, and the texture really pulls the randomness of the quilt together and leaves you with a very modern, artsy quilt. I’ll be honest in saying that it’s still not my cup of tea (I’m more of a shabby chic/French country type of girl) but I can imagine this fitting in very nicely in a house with bold, colorful splashes (like my mom’s house, wink, wink).

Modern Cross Quilt 2


About this Quilt:
Fabric: Robert Kaufman's Kona Cotton in various colors, 
border and back in Kona Slate, and "pops" of Heather Bailey's Pop Garden
Binding: Kona Cotton Slate
Size: approx. 18" x 20"
Pattern: Modern Cross
Quilting: Machine quilted in multiple colors


IMG_3521


Tonight, I’ll be figuring out how to attach a quilt sleeve to this baby so it can be hung up for the show on Friday. Phew, I made it!


P.S. Thanks to Mr. Side Stitches, who worked very hard to give my little blog a facelift! I love it!

Wednesday, August 3, 2011

Work in Progress Wednesday

Last Saturday, my sister called asking if I want to put a quilt in an art show that raises money for her church's community center. I decided that I could probably put something together since my Picket Fence quilt is finally done, so I said yes. The art show is a week from Friday.

So I got cracking on this small modern cross wall hanging (I know, another one!)


IMG_3443


This time I used a few scraps from the Pop Garden collection along with a variety of Kaufman's Kona Cottons. I feel the same way about this quilt top as I did about my other cross quilt at this stage, which is, I'm not in love with it. However, after I quilted and finished my previous quilt, I loved it (which is always good when you're gifting it to a father-in-law)! Quilting really does change the look of the quilt top. I'm hoping the same thing will happen with this one. I'm not quite sure what I don't love about this one, but I think that its the randomness of the blocks and the mix of colors. I'm much more used to very organized and coordinated quilts (I'm so glad designers make collections of prints!) I need more practice matching fabrics from different collections, but I may wait until my scrap collection is a bit bigger before I take up that challenge.

My background (and maybe border) fabric should arrive tomorrow so I'll get to quilting this weekend if all goes according to plan. I'm looking forward to quilting this one. Everything is so much easier when your quilt is only 20" squared!

Monday, July 25, 2011

Monday, July 18, 2011

Picket Fence Quilt Finished


After more than a month, my Picket Fence quilt is finished. This quilt reminds of country summers with its breezy colors and flower fields, just like looking over a picket fence into a vast meadow. These fabrics by designer Joel Dewberry are from the perfectly named Modern Meadow collection in the berry pallette. The colors range from raspberry to pink lemonade with mossy greens and warm beiges. I want to drag this quilt out to my imaginary wrap around porch on a cool summer night while watching the fire flies dance in my beautifully blooming (I must be imagining!) wildflower garden. *Sigh*


If you have a wrap around porch and a beautifully blooming wildflower garden with dancing fireflies, this quilt will be available in my brand new Etsy shop as soon as it's washed and dried. (Oh yeah, my country dream house also has a clothes line that's just perfect for drying quilts.)


About this Quilt:
Fabric: Joel Dewberry's Modern Meadow and Robert Kaufman Kona Cotton White
Binding: Pieced binding of various Modern Meadow prints
Size: approx. 50" x 66"
Pattern: Pendant Pattern inspired by Joel Dewberry's Pendant Quilt (though I didn't use his pattern)
Quilting: Hand sewn using pink and  green 100% cotton thread


I'm extremely pleased with the finished quilt. It's so satisfying to see it finally come together. I think the pieced binding finished it off perfectly and it gives the quilt a lot of character. 


The back of the quilt mainly features the Dogwood Blooms print but also showcases the Majestic Oak print (a personal favorite) along with the Nap Sack and Flower Fields prints.

Check back soon to see my first Etsy item posted! 

Saturday, July 16, 2011

A Summer Saturday

We went fruit picking this morning and picked the sweetest strawberries along with some blueberries, peaches, and nectarines. 

These strawberries will be finding their way into some ice cream soon. Did you know July is National Ice Cream Month?

Found some leisure time to finish my binding. Goal accomplished! More pictures to come.

Monday, June 27, 2011

Hand-quilting Jane Brocket Style


Not too long ago, Rita of Red Pepper Quilts, referred to Jane Brocket’s, The Gentle Art of Quiltmaking , in one of her posts and, as I was on a putting-things-on-hold-at-the-library kick, I added it to my queue.


When I received it last week, I quickly flipped through admiring the bold, color-rich, floral explosion of Jane’s quilts and then got down to reading. I love the way this book is set up with a story behind each quilt. Jane finds her inspiration in her garden, in beautiful dresses, in hammocks and beach huts, and then makes these wonderfully simple yet intensely colored quilts. If you want to quilt, but are afraid it’s too difficult or that you have to be too precise, read this book. Jane’s keep it simple, keep it fun approach to quilting is very refreshing if you spend most of your time drooling over intricately pieced, delicately stitched quilts. 


While I can admit, I hope with no offense to Jane, that I prefer fewer floral prints and more negative space in my quilts, I was quite inspired by her hand-quilting technique. She keeps it so simple by quilting with colorful thread in 2-3 mm stitches instead of fussing over the more accepted tiny pin-prick stitches of more traditional hand-quilting. She actually made me want to try it. And on top of that, she usually just does linear quilting, pretty much in the same way I’ve done my machine quilting in the past. So guess what, for better or worse, I’m going to try it on my Modern Meadow quilt. I was a bit nervous at first since I have in mind that I want to post this one on Etsy and I’m not sure whether hand-quilting will make it more or less desirable. I’d appreciate your input. But really, it can’t hurt too much to try, right? I need to be willing to push myself into new territories if I want to grow and learn. So I’m going with two different colors (the obvious pink and green) and am going to get right to work. Anyways, after a few rows of quilting, I love the way the stitching pops and it makes it look even more cute and summery than before. My stitches aren't perfect yet, but for a first attempt, I think it's turning out beautifully. I'm so excited to see it all finished!

Monday, June 20, 2011

Berry Modern Meadow Quilt Progress

I've been down and out this week recovering from minor surgery, but that meant I was home all week and was able to get a little bit of quilting done. But on Sunday, after I was really feeling better, I put a border on my quilt top and made my back panel. I'm excited to get quilting on this one. I just love the pattern and the fabrics of this quilt. It's so fresh and just screams summer. Mmmm...watermelon...

Does anyone else get attached to their quilts? I'm not sure I'll want to sell this one.


This quilt will be my largest so far measuring 50" x 66". I hope my little Brother machine can handle it!

Updates to come.

Saturday, June 11, 2011

Well, there goes my motivation...

I've been working on a quilt, really, I have (see proof below)!


But I'm realizing that quilting is not a summer sport. At least not for me. Our house is old and very drafty and, well, we don't have AC. *Gasp* I know. It's our own doing. I think in some sick sense we like to "rough it". Don't worry, we don't have any kids so no one needs to call the authorities. However, our house does get quite warm, to say the least, and our bedroom my awesome quilting studio just happens to be one of the hottest rooms in the house. Therefore, when I finally scrap together the few bits of energy that the heat or other busyness of the day haven't sucked away, I end up sweating it out over my sewing machine hoping that it doesn't overheat. And don't get me started on ironing! Phew! So, as I said, quilting, I'm realizing, is not for summertime. I'm okay with that. I've been wanting to try my hand at pillows, clothes, and a few other small projects. But now there is a less-than-half-finished quilt staring me down every night when I get into bed. I'm going to finish this before my summer hiatus. I pushed myself a bit today to get something done on it and sashing was up next. I got them all cut and sewed them together in one long strip. Then on to sewing them to my long-hexagon strips. First one done and pressed and...


...well, that doesn't look right does it?

*Poof* There goes my motivation. I packed up for the night. Decided to write a blog post instead (makes me feel like I'm still being productive) and will later watch a movie with my darling husband and my seam ripper. Curse you, tiny stitches! (Anyone seen Despicable Me? Love the scene with the tiny toilet! Does that mean I like potty humor?)

Anyways, if anyone finds my motivation, please send it my way. Much obliged.

Wednesday, May 25, 2011

Thanks and Upcoming Project

Is May a crazy month for anyone else? Between graduations, camping trips, and weddings, my May has filled right up. That's not a bad thing. I like being busy, but that leaves too little time to quilt and blog. Sorry if you feel neglected. June is a new month.

First, I would like to say a big THANK YOU to Carla over at Lollyquilts for featuring my Modern Cross Quilt on her blog. Carla is so sweet and was very excited about my quilt. I feel so blessed to be in such a supportive quilt-blogging community! So go check out Carla's blog and check out her new post featuring other modern cross quilts. I love the scrappy cross quilts made by Jenny at Cut, Sew, Iron, Repeat! Don't you want to try one? Check out the tutorial.


Now for my first June project. Remember these beauties?


They have just been sitting patiently by while I finished up my Zoo quilt. But now, their patience is waning. They want to be made into a gorgeous, summery quilt. Okay, okay. I'm listening!

I had been planning some kind of pendant quilt for these fabrics when all the sudden I saw Joel Dewberry's new quilt for the Aviary 2 line, and there it was! I think I'm going to use his pattern for my second Modern Meadow Quilt (this time in Berry). Though, I tend to use patterns somewhat loosely so I may not follow it exactly. Or maybe I will for a change. But either way, this is a gorgeous quilt pattern and I can't wait to get started on another quilt. Thankfully, June is just around the corner.

Tuesday, May 17, 2011

Bloggers' Quilt Festival

I'm so excited to be a part of the Bloggers' Quilt Festival! It's fun to see so many wonderful, creative quilts. Welcome to those of you who are visiting my blog from the Quilt Festival!


For those of you who already read my blog, you've seen this quilt before. I just finished up this baby quilt for my sister's friend. My sister called me a few months ago with great news that her friend was pregnant. I was not only excited for her friend, but also for myself. "Yes! I can make her a baby quilt!" I shrieked into the phone. Thankfully, that's what my sister had in mind, too. See, I'd already made quilts for my family members and was looking for my next victim. And honestly, I was hoping someone I knew would get pregnant soon so I could make a slightly smaller quilt.


I was thrilled to be able to pick out adorable, "I-want-a-baby-now" fabric. It was fun to shop around. When I found Alexander Henry's 2-D Zoo print, both my sister and I were sold on the spot.

I learned a lot of different things about quilting while working on this project which I've detailed in my post about this quilt. But I also learned a few things about myself like, if something stresses me out (arr, Perle 5), put it down and wait until the morning. My morning ideas are always much better than my after-10:00 p.m., tired and frustrated ideas. Those ideas tend to make big, ugly messes.

I also learned that sometimes simple is better. I love the simplicity of the front. I usually want to do too much and need to learn how to edit my creativity (this is where my husband often comes to the rescue). I think this was a good example of simplicity working really well. I need to remember that.


And finally, I realize that having a boy wouldn't be too bad. I always hoped for a girl because they have so many cute little things. But this boy quilt is pretty dang irresistible. Maybe it wouldn't be so bad after all.

Thanks for dropping by! Now go check out some other amazing creations by clicking on the button below...


Amy's Creative Side

Sunday, May 15, 2011

Modern Cross Quilt

It was a whirlwind week. I finished up my Day at the Zoo quilt and started right away on a cross quilt for my father-in-law. He graduated from Seminary this weekend and while we've known about this for awhile, we didn't think much or plan much for this visit. But when we started thinking about gifts, I knew I really wanted to make him something and I'd seen some interesting cross quilts on blogs and I thought that would be a good direction to go. I did a little research and came across this tutorial for the liberated cross block over at Lollyquiltz and then I hit the road running. I started the wall hanging on Monday night and finished it in the car on Friday. Then I snapped a few shots of it on the side of the highway. So yes, that is a corn field and a barbed wire fence.


About this Quilt:
Fabric: Robert Kaufman Kona Cotton
Binding: Kona Cotton in Paprika
Size: approx. 30" x 30"
Pattern: liberated cross blocks
Quilting: Free linear quilting with multiple colored threads


You can see the quilting a bit better in this picture, but it may be hard to see the different colored threads. I used 5 different colors and changed them every few inches. At first I thought it might make the quilt a little too busy, but it actually drew everything together and the texture of the quilt was just wonderful. I especially love the way the back looks with all the uneven lines.


I also embroidered a Bible reference on the quilt, hoping to encourage him in his current ministry overseas. My father-in-law is Korean, but for those who can't read this, the reference is Hebrews 12:1-3.


A lot of Koreans tell me that I have really "cute" handwriting when I write in Korean. I'm pretty sure that just means that I write like a 3-year-old, which is probably true. I'm okay with that.

I'm really proud of myself for producing this entire quilt in less than one week and though I had some mixed feelings about it as it was coming along, I love the final result. This is certainly the most "artsy" piece I've done so far, but it was fun to do something a little more experimental.

Wednesday, May 11, 2011

Day at the Zoo Quilt Finished

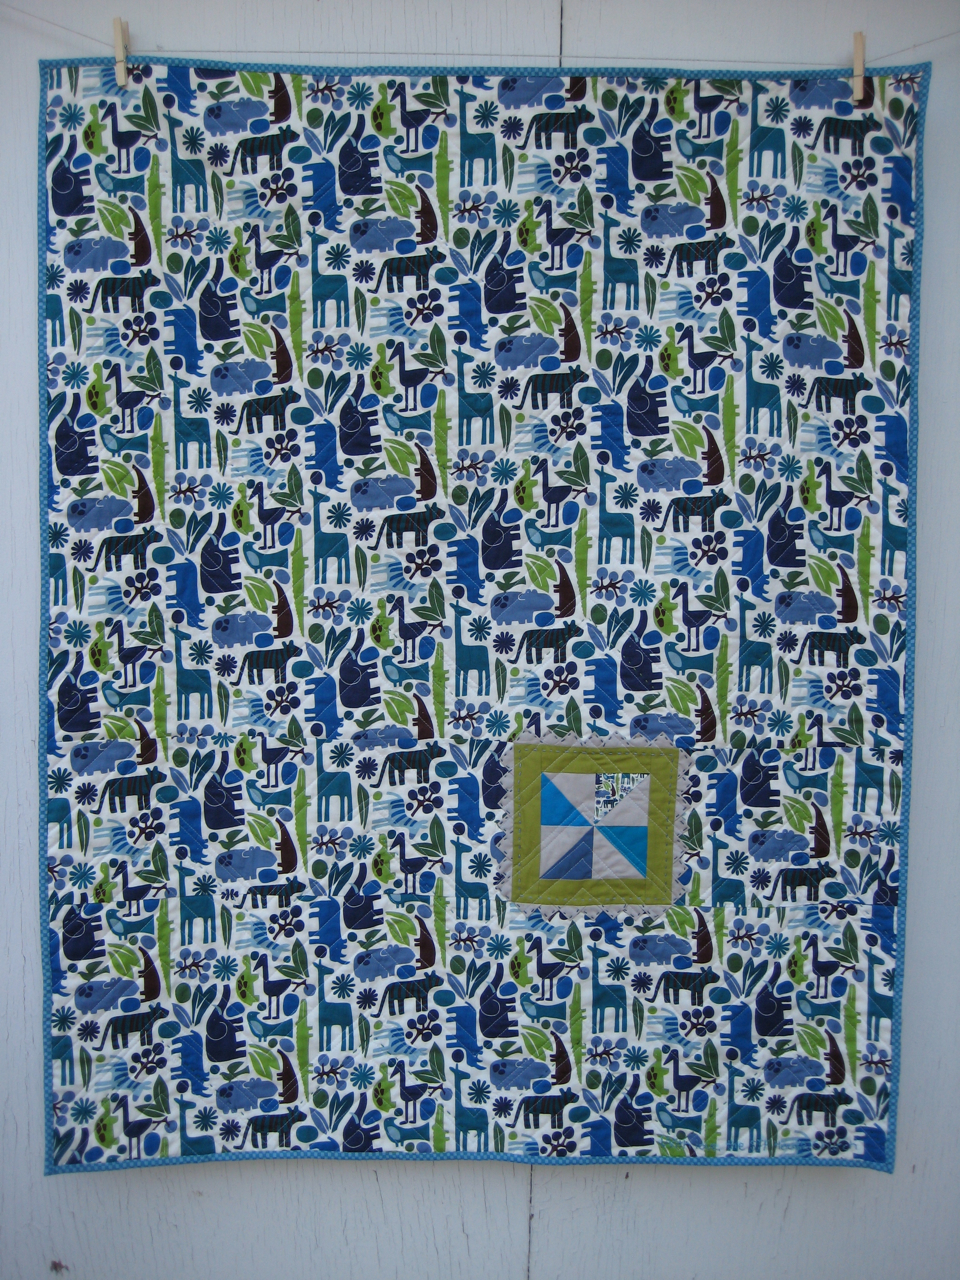
After weeks of working on this quilt and looking at the adorable Alexander Henry 2-D Zoo prints, I'm finally finished. This quilt makes me so proud and I hope the little yet-unborn baby boy will love it! The colors are so playful and fresh set off by the bold zigzags.

I don't want to give this quilt away. I might have a little boy someday...


About this Quilt

Fabric: Alexander Henry's 2-D Zoo and Teeny Tiny Zoo
and Robert Kaufman's Kona Cotton in Ash, Cyan, Olive, Cadet Blue, and Turquoise
Binding: Pop Parade by Metro
Size: approx. 40" x 50"
Pattern: Zigzag
Quilting: Machine Quilted in a zigzag pattern using coordinating thread & hand-quilted using contrasting DMC Perle 5 Cotton thread


Since I'm still in the learning process (aren't we always?) there were a few new techniques that I tried with this quilt. This was my first time playing with half-square triangles and I think these big 5" squares were a great place to start. Since the HST is the foundational block for numerous fun and beautiful patterns, I'm sure I'll become very familiar with them. Practice makes perfect!


This was also my first time hand-quilting. You can read all about that in my Tuesday Tips #2 post. I also used coordinating thread for my machine quilting which really makes the hand-quilting pop. This idea was inspired by this scrumptious quilt over at Red Pepper Quilts. I love the effect of the hand-quilting and colored thread. I am using colored thread on my current project, too, straying from my usual white. Ekk!


The pioneer points on the back detail were also new to me. I wanted a funky border that would make the pinwheel stand out a bit more from that busy back and that would tie in the zigzag pattern. However, I'm not sure I would have added them if I were to do it again. I'm not convinced that they added much and they were difficult to quilt. My advice? Save pioneer points for quilt borders. Though, they do add some youth to the quilt. I also think that they would look very cute on a dinosaur-themed quilt. Just throwing that out there.


This quilt is going to my sister next week so she can gift it at an upcoming baby shower. I hope this quilt is well loved and will last for many years to come. I also made it a bit bigger than some baby quilts in hopes that this little boy will be able to tote his quilt around well into his elementary years.

Sister, bring a crowbar, you may have to pry this one out of my fingers. You've been warned. 

Tuesday, May 10, 2011

Tuesday Tips #2

Last week I was raving about chunky hand-quilting accents with Perle Cotton, but I was ranting about the thickness of Perle 5, which turns relaxing hand-quilting into finger pain and frustration. However, after writing that post last Tuesday night, I woke up on Wednesday and had a little time to quilt before getting ready for work. My hands were slightly clammy making the tugging war simply impossible to win. Then…ding…light bulb. Sitting on my sewing desk were my quilting gloves (which really are all-purpose work gloves from Home Depot, but they work great) and as soon as I put one on my left hand and got to stitching, I was pulling stitches through with only little resistance and a firm grip. While I would still suggest using Perle 8 as recommended by most quilters, Perle 5 works pretty well in a pinch assuming you have a left-handed rubberized glove to pull you through. My hand-stitching came along very quickly after that discovery. Perhaps now all my leftover Perle 5 won’t go to waste. Phew! This tip was just too good to keep to myself.

Three cheers for the rubber gloves!

Check back tomorrow to see the finished product. I can't wait to share!

Tuesday, May 3, 2011

Tuesday Tips #1

So here I am, ready to give you a quilting tip (I feel so under-qualified!)


Use Perle Cotton for some very cute chunky hand-quilting detail. I love the way it's made my Day at the Zoo quilt look even more fun and cozy. It's especially well suited for baby quilts because it reminds me of Crayon lines. Not perfectly even, but bold and playful. I just love it, especially with the contrasting colors. Plus Perle Cotton has a shiny, silky quality that gives the quilt some nice texture. Try it out on your next quilt. You will love it!


But learn from me here, don't use Perle Cotton 5 like I did! Use Perle 8 like all the sane quilters of the world. Once again my laziness (and frugality) got the best of me and I just grabbed the Perle 5 that I could easily find at Michael's. They didn't have Perle 8 in the colors I wanted and I wasn't keen on paying for shipping. So I just went with Perle 5 totally ignoring what Nova (I love that name!) over at a cuppa and a catch up wrote after she had a rough time quilting with Perle 5. Let me tell you, I totally agree with her. I can't feel the side of my left index finger after all that tugging on the needle just to get the fatty thread through. It is not pleasant to quilt with! Listen to Nova! Listen to me! It may look cute, but by the time you finally thread your needle (~5 minutes of utter frustration) and start yanking away at your thread, you'll be regretting that you didn't just pay the shipping and wait patiently for Perle 8. Do your poor little index finger a favor and learn from my laziness (I sense this might be a theme for Tuesday Tips).

Wednesday, April 27, 2011

Wednesday Progress Report

I’ve been working hard this week. I finished piecing my Day at the Zoo quilt top featuring Alexander Henry’s Teeny Tiny Zoo and several different Robert Kaufman Kona Cotton solids (I’ll specify colors in a later post) in a variety of cool colors. Oh yes, and can I say that not only are Teeny Tiny Zoo and 2-D Zoo prints maternal-instinct-producing-ly cute, they are also a pleasure to work with. They were hardly wrinkled when I pulled them out of the dryer and they are so nice to press and sew. A real treat!


This quilt is my first attempt at piecing HSTs and while my points turned out decently well, I could certainly use more practice. After piecing the entire top (doesn’t that always happen?), and while I was working on a pinwheel for the back, I realized that it’s actually much easier to piece them if you press the seams in opposite directions so they sort of lock together as you stitch them. So there’s one more lesson learned! I’m thinking of having a “Tuesday Tips” series in which I would post something new that I’ve learned about quilting since I’m learning so much as I go. I’m afraid to commit to a schedule though. Tune in next Tuesday to see if Side Stitches can overcome her fear of commitment and reader expectation!


I also finished piecing the back, but I’m not sure I’m ready to share that yet. Let’s just say it involves pinwheels (well, just one) and pioneer points! Tonight’s mission is basting.

In other news, I’ve finished my second Modern Meadow Mug Rug which features not only Joel Dewberry’s luscious prints, but Robert Kaufman’s Kona Cotton in Ash. I see a lot of people using Ash as a neutral background and now having worked with it, I see why. While it’s a very subdued color it seems to go equally well with warm and cool tones.

The front
The back
This little mug rug also gave me some good practice for lots of upcoming zigzag quilting.  As I said, mug rugs are the perfect place to try out new skills. One more rug to go!

Monday, April 25, 2011

My Introduction to HSTs

Every quilter eventually has to face the versatile Half Square Triangle (HST) and, admittedly, I was looking forward to the encounter. As an avid reader of Red Pepper Quilts, I’ve fallen in love with HST quilt patterns of all sorts from the pinwheel to the zigzag because Rita has mastered the art. Let’s face it, these guys are a quilting necessity and I needed to add them to my tool box. So as I was designing a baby quilt for the little boy of an architect, I knew that zigzags were the way to go. Strong lines, bold colors, yet playful and fun. The HST had to be conquered.

I started out mostly using this simple tutorial showing the quick easy way to make HST. I have to say that I do think that this is the best way to make them and it seems that many people would agree with that. However, I was still unsure about what size to cut my squares and how to trim them up well. I wanted my finished squares to be 5.5” before piecing, so I started out cutting my squares to 6”, but after making a few found that when I went to trim, some of them were a bit lean. So I went up to 6.5” and found that though I had more scraps, and certainly bigger than the scraps featured in Rita’s scrap bowl, that the one inch extra is probably good for me for now. And hey, I’m new at this business! 


Anyways, after all of my HSTs were trimmed, I came across this brilliant tutorial by Jackie at Canton Village Quilt Works. Amazingly enough, this is exactly what I did (though I don’t have a perfect square tool) even down to the ironing after I stitched down the middle. Though, I did that not so much to set my stitches, but because I found the they got a little stretched out as I stitched. Is that normal? I tried to be careful because of the biases, but still, they got a tiny bit wonky and found that the steam helped them tighten up again.

So after much cutting, sewing, ironing, and trimming (and much back pain due to crouching over my dining room table to line up my ruler right) I have a lovely stack of half square triangle blocks. Ta-da!


Now I’m just praying these babies will line up okay once I get to joining them. Any advice on how to press them so I won’t get such bulky points, or is that to be expected?

Thursday, April 21, 2011

My First Mug Rug


I’ve been reading about mug rugs all over the quilting blogosphere so these cute little guys have been on my mind lately. There was even a week of Mug Rug Madness (check it out!) Though I’m on a time-crunch to finish up a commissioned baby quilt (I’m working on it, I promise!), we have a friend who is getting married at the end of April and when I checked out his registry and saw three Fiesta mugs, I knew that they would be perfectly paired with some Modern Meadow mug rugs. And who wouldn’t want some adorable little mug rugs to go along with some new mugs? These sweet little mats invite you to not only grab a cup of coffee or tea, but a cookie or a piece of cake to go with it.

While these mini quilts brighten up your table and catch your crumbs, they are also quick and easy to make! I made the whole quilt (minus the binding) in less than an hour or so and was able to hand finish the binding before one episode of Downton Abbey had finished up. The other great thing about mug rugs is that you can practice new piecing, stitching, or binding techniques and not feel like you’ve ruined thirty hours worth of work if something goes wrong. I might try out machine finishing my binding on one just to try it out.

I have two more to go to finish up the set.

I found the design for this particular mug rug on a blog that I’ve recently discovered by Ryan Walsh (who not only is a great quilter, but has a really nicely designed blog, too!) I used the template that he very kindly provided in his tutorial for this fun Dresden wedges mug rug.

And there is something about guys and their mug rugs, because I think my next mug rug will probably be patterned after this red and aqua rug by John over at Quilt Dad. This guy is amazing and is not only a talented quilter and designer, but also seems like a sweet dad. Check him out!


This cute little quilt is 6” x 10” and hopefully will be used for many years under many great cups of coffee. Just throw some of Kim Boyce’s cookies on there and you’ll never want to leave.

Saturday, April 16, 2011

Modern Meadow Quilt-Finished

It's true, I'm finally finished with my custom ordered Modern Meadow Quilt and I'm so pleased with it! I just love these fabrics from Joel Dewberry's line. 


About this Quilt
Fabric: Joel Dewberry's Modern Meadow and Robert Kaufman's Kona Cotton in Chocolate
Size: approx. 48" x 60"
Pattern: Descending Squares
Quilting: Machine Quilted in a Step Pattern


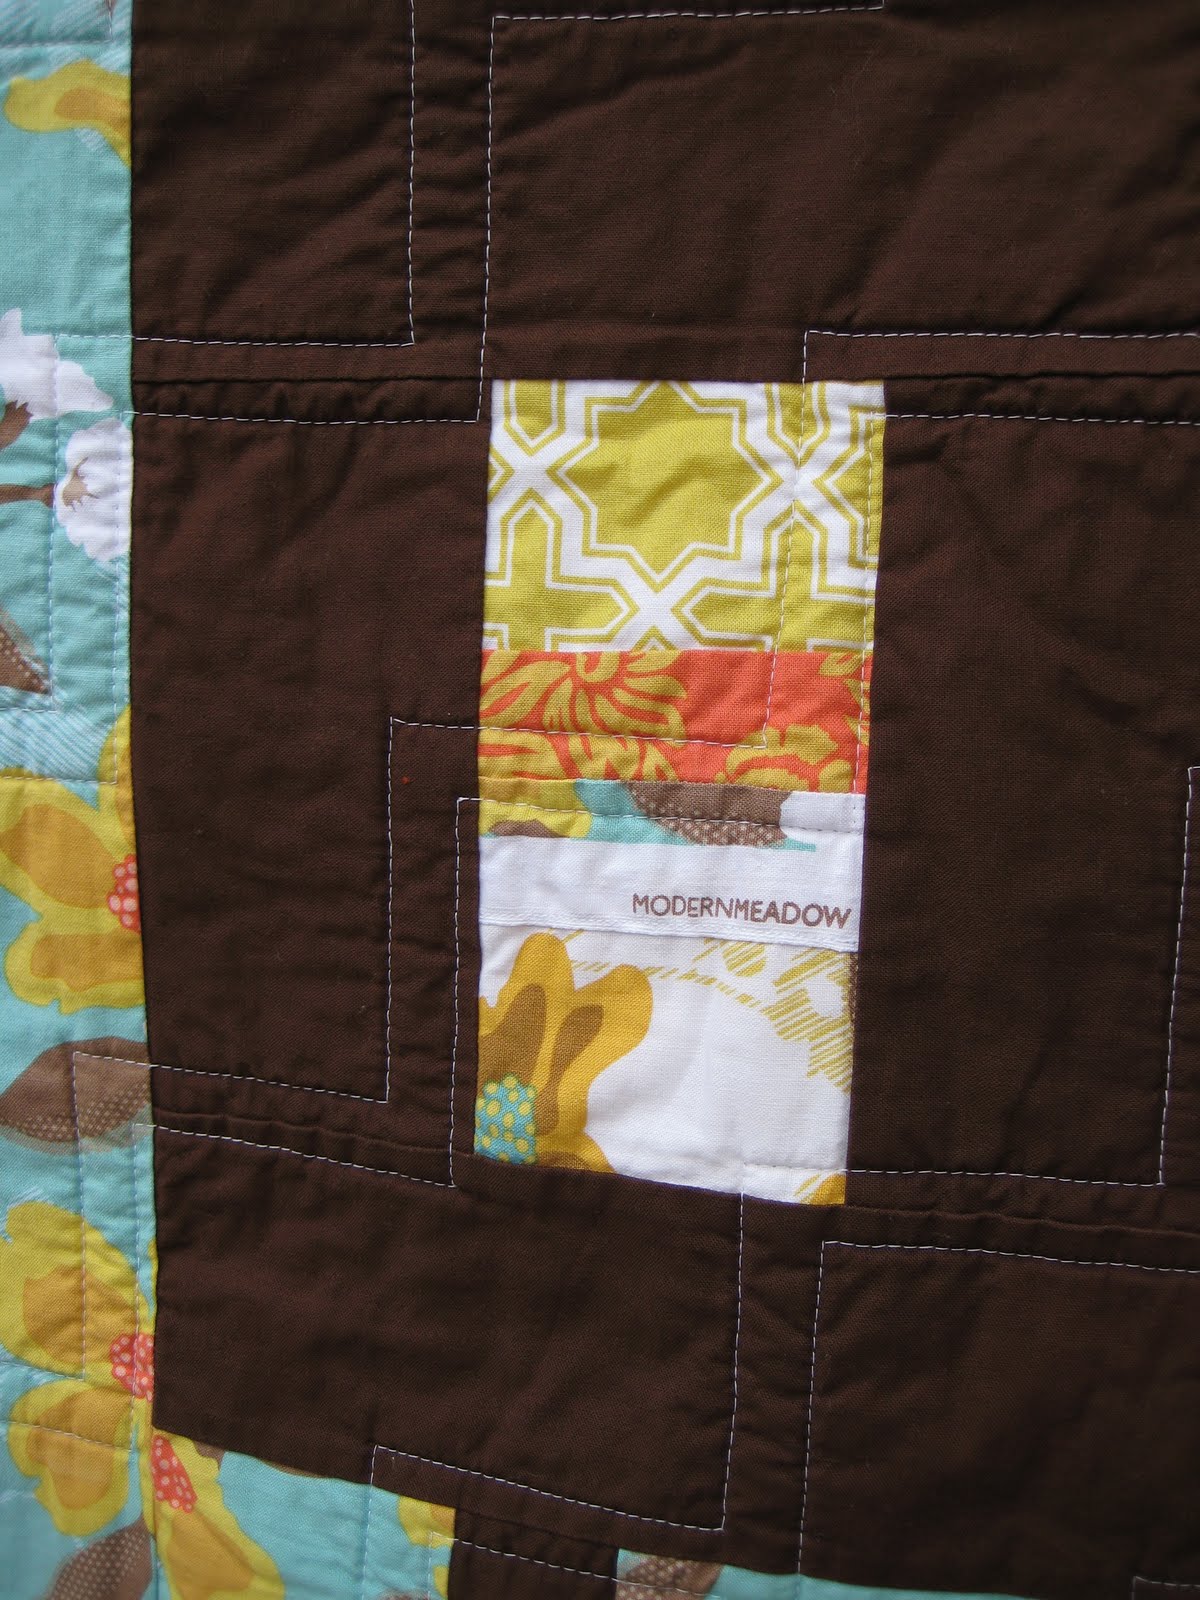
The back of the quilt features the Dogwood Bloom print in this beautiful turquoise as well as small scraps and selvages of some of the other fabrics in the line. The back was partially inspired by the back of Angela's Kaleidoscope Quilt over at Fussy Cut (I love her colorful quilt and her blog!)


I used a couple of the selvages to label the quilt and to add a little bit of interest to the back blocks. I love how they turned out and definitely plan to use more selvages in my future quilts. 


This quilt is now settling into its new home in Ohio.